Desi Paya on Wood Fire – Slow Cooked Tender Trotters
There are few dishes in South Asian cuisine that command as much respect and devotion as desi paya. This ancient dish of slow-cooked trotters is a testament to the culinary wisdom of our ancestors, who understood that the most humble ingredients, when treated with patience and respect, could produce the most extraordinary results. Paya, which means feet in Urdu and Hindi, refers to the trotters of goat, lamb, or beef that are simmered for hours until the collagen, connective tissue, and bone marrow dissolve into a rich, gelatinous broth that is both deeply nourishing and incredibly flavorful.
When cooked on a wood fire, paya takes on an entirely new dimension of flavor. The gentle, fluctuating heat of the wood fire creates a cooking environment that is impossible to replicate on a modern gas stove. The subtle smokiness that permeates the broth, the slow and even rendering of the collagen, and the way the spices bloom in the low, consistent heat all contribute to a paya experience that is truly transcendent. In this comprehensive guide, we will walk you through every step of making desi paya on wood fire, from cleaning the trotters to serving the final dish in the most traditional and authentic way possible.
The Cultural Significance of Paya
Paya holds a special place in the culinary traditions of South Asia, particularly in the regions of Punjab, Sindh, and the Frontier provinces. It is traditionally associated with celebrations, festivals, and special occasions. In many families, paya is the go-to dish for Eid mornings, wedding breakfasts, and the birth of a child. It is also a beloved dish for the recovery of the sick, as the collagen-rich broth is believed to have healing properties that aid in the recovery of joints, bones, and skin.
In the old cities of Lahore, Delhi, and Peshawar, paya shops would open before dawn, serving steaming bowls of this precious broth to early risers. The ritual of eating paya involves tearing pieces of fresh naan or kulcha, dipping them into the rich broth, and savoring the tender, fall-off-the-bone meat. It is a communal experience that brings people together, and in many ways, it represents the soul of South Asian hospitality.
Cleaning and Preparing the Trotters
Proper cleaning and preparation of the trotters is the most critical and time-consuming step in making paya. Trotters are inherently messy, with hair, hooves, and other impurities that must be thoroughly removed before cooking. Skipping or rushing this step will result in a dish that is gritty, unappetizing, and potentially unsafe to eat.
Start by purchasing fresh trotters from a reputable butcher. Ask the butcher to singe off the hair with a torch, remove the hooves, and split the trotters lengthwise. This prep work at the butcher saves significant time at home. Once home, rinse the trotters under cold running water to remove any charred bits from the singeing process.
Fill a large pot with water and bring it to a boil. Add 2 tablespoons of salt and 1 tablespoon of turmeric powder. The turmeric acts as a natural antiseptic and helps remove any remaining impurities. Add the trotters to the boiling water and blanch for 10 minutes. You will see a significant amount of scum and foam rise to the surface. Drain the water and rinse the trotters thoroughly under cold running water, scrubbing each piece with your hands or a brush to remove any remaining debris.
Inspect each trotter carefully. Look for any remaining hair, which can be removed with a pair of tweezers or by scraping with a knife. Check the split surfaces for any bone fragments or gritty particles. This meticulous cleaning process may seem tedious, but it is essential for producing a paya that is clean, clear, and enjoyable to eat.
Once cleaned, pat the trotters dry and set them aside. You should have approximately 1 kilogram of cleaned trotters, which will serve 4 to 6 people generously.
The Slow-Cooking Process on Wood Fire
Cooking paya on a wood fire is an experience that connects you to centuries of culinary tradition. The wood fire provides a heat that is both gentle and dynamic, with the flames rising and falling in a natural rhythm that keeps the liquid at a perfect, rolling simmer. This is the ideal cooking environment for paya, as the low, consistent heat slowly breaks down the collagen and connective tissue without toughening the meat.
Set up your wood fire in a safe, well-ventilated outdoor area. Use hardwood logs like mango, neem, or sheesham, which burn slowly and provide consistent heat. Avoid softwoods like pine, which burn too quickly and can impart a resinous flavor to the food. Allow the wood to burn down until you have a bed of glowing embers with a moderate flame. This is the perfect heat level for slow-cooking paya.
Place a large, heavy-bottomed pot, preferably a cast iron or brass degchi, over the wood fire. Add 4 to 5 tablespoons of ghee or mustard oil and let it heat up. Once the ghee is shimmering, add the whole spices: 2 bay leaves, 4 to 5 green cardamom pods, 2 black cardamom pods, 1 small cinnamon stick, 4 to 5 cloves, 1 teaspoon of black peppercorns, and 1 teaspoon of cumin seeds. Let them sizzle in the hot ghee for about 30 seconds until they release their aromatic oils.
Add 2 large onions, thinly sliced, and cook until they are golden brown, stirring frequently. The wood fire heat may be uneven, so move the pot around to ensure even cooking. Once the onions are golden, add 3 tablespoons of ginger-garlic paste and cook for 2 minutes until the raw smell dissipates.
Add 2 tablespoons of coriander powder, 1 tablespoon of cumin powder, 1 tablespoon of red chili powder, 1 teaspoon of turmeric powder, and 1 tablespoon of salt. Stir the spices into the onion mixture and cook for 1 minute. This step, known as bhunai, develops the deep, complex flavors that form the foundation of the paya broth.
Add the cleaned trotters to the pot and stir to coat them with the spice mixture. Let them cook in the spices for 5 to 7 minutes, turning them occasionally to ensure even coating. The initial cooking in the spice paste allows the meat to absorb the flavors before the liquid is added.
Pour in enough water to cover the trotters by at least 3 inches. Use approximately 2 to 2.5 liters of water. The water level will reduce significantly during the long cooking process, and you want to ensure there is enough liquid to create a generous amount of broth. Bring the water to a boil over the wood fire, then reduce the heat to the lowest possible setting by adjusting the logs or pushing the emhs to the sides.
Cover the pot with a tight-fitting lid and let the paya cook undisturbed for 5 to 7 hours. Yes, that is correct. Five to seven hours of slow cooking is what transforms tough, cartilaginous trotters into a dish of extraordinary tenderness and richness. Every hour or so, check the fire and add more wood if needed. Stir the paya gently once every hour to prevent sticking, but avoid excessive stirring as it can cause the broth to become cloudy.
The Spice Blend: Building Layers of Flavor
The spice blend for desi paya is deliberately simple, designed to complement the natural flavor of the trotters rather than overpower them. The whole spices used at the beginning provide a warm, aromatic foundation. As the paya cooks, these spices slowly release their essential oils into the broth, creating a complex, layered flavor profile.
In addition to the whole spices used at the start, add a potli masala or spice bundle during the last 2 hours of cooking. This bundle should contain 1 tablespoon of fennel seeds, 1 teaspoon of coriander seeds, a small piece of mace, 2 green cardamom pods, and a bay leaf, all tied in a muslin cloth. The potli infuses the broth with a delicate sweetness and complexity that elevates the dish to another level.
Towards the end of the cooking time, add 1 teaspoon of garam masala and adjust the salt. The garam masala should always be added at the end to preserve its volatile aromatic compounds. Taste the broth and adjust the seasoning. The broth should be rich, savory, slightly spicy, and deeply satisfying with a subtle sweetness from the caramelized onions and fennel.
The Broth: Liquid Gold
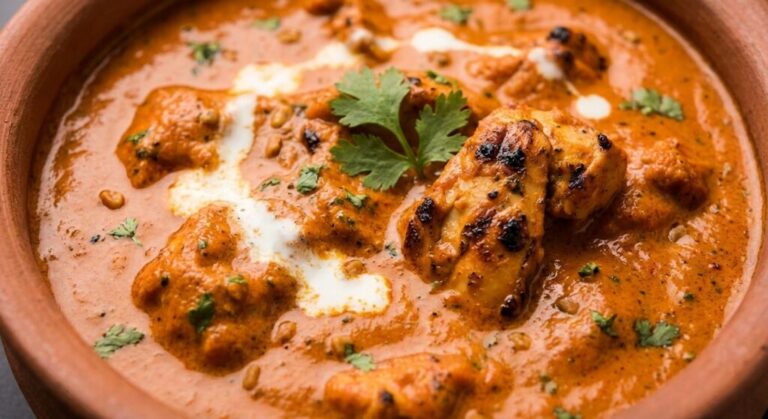
The broth is the true star of desi paya. When the trotters have finished cooking, the collagen and connective tissue will have completely dissolved into the liquid, creating a broth that is thick, gelatinous, and incredibly rich. When cooled, this broth should set into a jelly-like consistency, which is the hallmark of a well-made paya.
The broth is packed with nutrients. Collagen supports joint health, skin elasticity, and gut lining integrity. The minerals extracted from the bones, including calcium, magnesium, and phosphorus, contribute to bone health. The amino acids in the broth, particularly glycine and proline, have anti-inflammatory properties and support the immune system. This is not just food. It is medicine in its most delicious form.
If the broth is too thin after cooking, remove the lid and increase the heat to reduce it to the desired consistency. If it is too thick, add some hot water and stir to combine. The ideal consistency should be thick enough to coat a spoon but still pourable.
Serving Suggestions: The Traditional Way
Desi paya is traditionally served for breakfast or as a late-night snack. In the old cities of Lahore and Delhi, paya shops would serve this dish with fresh, hot tandoori naan or kulcha. The soft, absorbent bread is perfect for soaking up the rich, gelatinous broth.
Serve the paya in deep bowls, ensuring each serving has at least two trotter pieces and a generous amount of broth. Garnish with freshly chopped coriander, julienned ginger, sliced green chilies, and a squeeze of lemon juice. The fresh garnishes provide a bright contrast to the deep, slow-cooked flavors of the broth.
A side of chopped onions mixed with lemon juice and salt is a classic accompaniment. Some people also enjoy paya with a side of chana or chickpeas, which adds a textural contrast and additional protein to the meal. For a complete traditional experience, serve the paya with warm, fluffy naan and a hot cup of chai.
Common Mistakes to Avoid
- Not cleaning the trotters thoroughly: Inadequate cleaning results in a gritty, unpleasant broth. Spend the time needed to properly clean each piece.
- Cooking on high heat: Paya requires extremely low and slow cooking. High heat will toughen the meat and prevent the collagen from dissolving properly.
- Using too little water: The water will reduce significantly during the long cooking process. Start with enough to cover the trotters by 3 inches and check periodically.
- Stirring too often: Excessive stirring breaks up the meat and makes the broth cloudy. Stir gently and only once every hour.
- Rushing the cooking time: There are no shortcuts to great paya. A minimum of 5 hours is needed for the trotters to become truly tender and the broth to develop its characteristic richness.
Frequently Asked Questions
Can I make paya in a pressure cooker instead of wood fire?
Yes, a pressure cooker can significantly reduce the cooking time. After the initial searing and spice cooking steps, add the water and pressure cook for 45 minutes to 1 hour on very low heat, allowing 10 to 12 whistles. Let the pressure release naturally. The paya should be tender and the broth rich. However, the smoky flavor from the wood fire will be missing. To add a smoky note, you can use the dhungar method by placing a piece of hot charcoal in a small bowl set in the pot, pouring a few drops of ghee over it, and covering the pot immediately for 2 minutes.
What is the best meat for paya, goat or beef?
Both are excellent choices, but they produce different results. Goat paya is more traditional in North Indian and Pakistani cuisine and has a milder, more delicate flavor. The broth tends to be lighter and clearer. Beef paya has a richer, more robust flavor and produces a thicker, more gelatinous broth. In Hyderabad and the Deccan region, beef paya is preferred, while in Punjab and the Frontier, goat paya is more common. Choose based on your personal preference and what is available in your area.
How do I know when the paya is done?
The paya is done when the meat is falling off the bone and the broth has a thick, gelatinous consistency. You should be able to pull the meat apart easily with a fork or your fingers. The broth should coat the back of a spoon and have a slightly sticky, jelly-like quality. If the meat is still tough or the broth is thin and watery, continue cooking for another hour or two. Every batch of paya is different depending on the age and size of the trotters, so use these visual and textural cues rather than relying solely on time.
Can I freeze leftover paya?
Paya freezes exceptionally well and can be stored for up to 3 months. In fact, many paya enthusiasts claim that frozen and reheated paya tastes even better, as the flavors continue to develop during storage. Cool the paya completely, then portion into airtight containers or freezer bags. When you want to serve, thaw overnight in the refrigerator and reheat gently on the stovetop over low heat. The broth may have set into a solid jelly when cold, which is a sign of a well-made paya. It will return to its liquid state as it heats up.

Reader Comments
Leave a Comment
No comments yet. Be the first to share your thoughts!