Degi-Style Bhuna Gosht Recipe
CookShaheen
September 14, 2026
19 min read
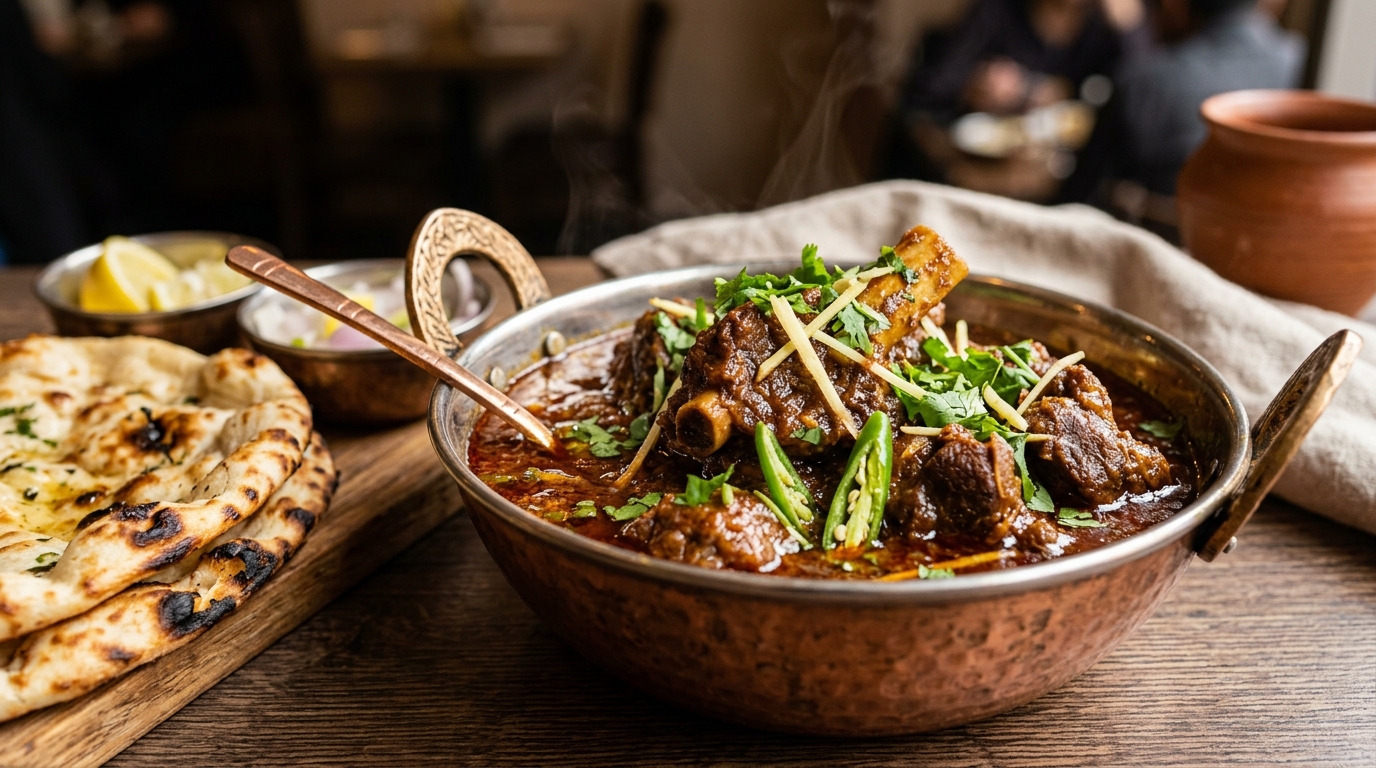
Degi-Style Bhuna Gosht is a rich, spicy, and deeply flavorful mutton dish made by slowly roasting onions, whole spices, ginger-garlic paste, and powdered spices until the oil separates. Unlike a regular mutton curry or korma, this recipe is prepared with very little water and relies on slow cooking and thorough bhunai to create its signature taste.
The secret to perfect bhuna gosht is simple: do not rush the roasting process. Mutton must be cooked patiently with the masala so that every piece becomes tender, juicy, and coated in a thick, flavorful gravy.
Serve this delicious homemade bhuna gosht with chapati, rumali roti, naan, paratha, or steamed rice for a satisfying family meal.
Recipe Summary
- Recipe name: Degi-Style Bhuna Gosht
- Preparation time: 20 minutes
- Cooking time: 60–75 minutes
- Total time: Approximately 1 hour 35 minutes
- Main ingredient: Mutton
- Cooking method: Stovetop slow cooking
🌍
Cuisine
Mughlai-inspired, North Indian, Pakistani
🔥
Calories
465 kcal / serving
🥩
Main Ingredient
Mutton (Bone-in)
Ingredients for Degi-Style Bhuna Gosht
For the Mutton
- 750 grams mutton, preferably bone-in
- 1½ tablespoons mustard oil
- 4 medium onions, finely grated (divided)
- 2–3 cloves
- 2–3 green cardamoms
- 2 tablespoons ginger-garlic paste
- ½ teaspoon turmeric powder
- 100 grams plain yogurt, whisked
- 20–25 grams khoya or mawa, crumbled
- 2 tablespoons desiccated coconut or coconut powder
- 1 teaspoon garam masala powder
- 1–2 cups water, as required
- Salt to taste
Powdered Spices
- 1 teaspoon roasted cumin powder
- 2 teaspoons coriander powder
- 1½ teaspoons red chili powder
- ¼ teaspoon black pepper powder
- ½ teaspoon turmeric powder
For Finishing & Garnish
- 1 tablespoon fresh coriander, chopped
- 1–2 green chilies, slit lengthwise
- A small pinch of garam masala, optional
- Ginger julienne, optional
How to Make Degi-Style Bhuna Gosht
1. Prepare the Onions and Spices
Finely grate four medium onions. Set aside one grated onion to add later during the cooking process. The remaining grated onions will be used at the beginning of the recipe.
Whisk the yogurt until smooth and keep it at room temperature. Crumble the khoya or mawa so that it mixes easily into the gravy.
In a small bowl, combine the roasted cumin powder, coriander powder, red chili powder, black pepper powder, turmeric powder, and a little salt. Keeping the spices ready makes the cooking process easier.
2. Heat the Mustard Oil
Place a heavy-bottomed pan or handi over medium heat. Add the mustard oil and heat it until it becomes hot and starts releasing a light amount of smoke.
This step is important because heating mustard oil properly removes its raw smell and gives the mutton a wonderful traditional flavor. Reduce the heat to low before adding the onions.
3. Roast the Onions
Add the three grated onions to the hot oil. Cook them over low to medium heat, stirring regularly, until they become light golden brown.
Do not burn the onions. The color of the onions determines the final color of the bhuna gosht. Light golden onions will give the dish a beautiful reddish-brown color and a balanced sweetness.
Once the onions become slightly pink and begin to soften, add the cloves and green cardamoms. Fry them with the onions for a minute so their aroma is released into the oil.
4. Add Ginger-Garlic Paste
Add the ginger-garlic paste and mix well. Cook it with the onions for 2–3 minutes, stirring continuously.
The paste should be properly fried until its raw smell disappears. This step helps create a rich and balanced base for the mutton masala.
5. Roast the Mutton
Add the washed and drained mutton to the pan. Increase the heat to medium and mix the meat thoroughly with the onion and ginger-garlic mixture.
Cook the mutton for 8–10 minutes, stirring frequently. The pieces should begin to change color and release their natural juices.
This is one of the most important stages of the recipe. Avoid adding water too early. If the mutton is only fried for a minute or two, the final dish will not have the deep flavor associated with authentic bhuna gosht. Continue cooking until the oil begins to separate slightly and the mutton looks well coated with the onion mixture.
6. Add the Reserved Onion and Powdered Spices
Add the reserved grated onion to the pan and cook for another 2–3 minutes.
Now add the roasted cumin powder, coriander powder, red chili powder, black pepper powder, turmeric powder, and salt. Mix everything thoroughly.
Add a few tablespoons of water to prevent the powdered spices from sticking or burning. Cook the mutton with the spices for another 5 minutes over medium heat.
This process is known as bhunai. It allows the spices, onions, and meat to cook together, creating the deep, concentrated flavor of this dish.
7. Slow-Cook the Mutton
Add 1–2 cups of water to the pan, depending on how much gravy you prefer. Mix well and bring the liquid to a gentle boil.
Cover the pan with a tight-fitting lid. Reduce the heat to low and cook the mutton slowly for 30–40 minutes, or until it becomes tender.
The exact cooking time will depend on the cut and age of the mutton. Check the pan after approximately 25 minutes and stir once to ensure that the masala is not sticking to the bottom. If the water has evaporated but the mutton is not tender, add a little more hot water and continue cooking.
8. Add Coconut Powder
Once the mutton is partially cooked, add two tablespoons of desiccated coconut or coconut powder.
Coconut adds a subtle nutty taste and gives the gravy extra body. Mix it well into the masala, cover the pan again, and continue cooking until the mutton is completely tender. The meat should be soft enough to cut easily with a spoon, while still holding its shape around the bone.
9. Add Yogurt
When the mutton is tender and the oil has started to rise to the surface, lower the heat completely.
Add the whisked yogurt gradually, stirring continuously. This prevents the yogurt from curdling. Cook the mutton with the yogurt for 5–7 minutes. The yogurt balances the sweetness of the onions and adds a mild tanginess to the gravy. Continue stirring until the yogurt blends completely into the masala and the oil begins to separate again.
10. Add Khoya or Mawa
Add the crumbled khoya to the pan and mix it thoroughly with the mutton gravy.
Cook for another 5 minutes over low heat. Khoya gives the gravy a rich, slightly grainy texture and a deep, earthy taste. It also helps the thick gravy cling beautifully to each piece of mutton. Do not add too much khoya, as it can make the gravy overly sweet or heavy.
11. Finish with Garam Masala
Add one teaspoon of garam masala powder and mix gently.
Cook for another minute, then check the salt and consistency. The gravy should be thick and cling to the meat rather than looking watery.
Turn off the heat, cover the pan, and let the bhuna gosht rest for 10 minutes. This resting time allows the spices to settle and the flavors to become even richer.
For the mutton
- 750 grams mutton, preferably bone-in
- 1.5 tablespoons mustard oil
- 4 medium onions, finely grated (divided: 3 for roasting, 1 reserved)
- 2-3 cloves
- 2-3 green cardamoms
- 2 tablespoons ginger-garlic paste
- 0.5 teaspoon turmeric powder
- 100 grams plain yogurt, whisked room temperature
- 20-25 grams khoya or mawa, crumbled
- 2 tablespoons desiccated coconut or coconut powder
- 1 teaspoon garam masala powder
- 1-2 cups water, as required
- Salt to taste
Powdered spices
- 1 teaspoon roasted cumin powder
- 2 teaspoons coriander powder
- 1.5 teaspoons red chili powder
- 0.25 teaspoon black pepper powder
- 0.5 teaspoon turmeric powder
For finishing
- 1 tablespoon fresh coriander, chopped
- 1-2 green chilies, slit lengthwise
- pinch garam masala optional
- Ginger julienne optional
Prepare the onions and spices: Finely grate 4 medium onions. Set aside 1 grated onion for later. Whisk the yogurt until smooth. Crumble the khoya. Mix roasted cumin, coriander, red chili, black pepper, and turmeric powder in a small bowl with a little salt.
Heat the mustard oil: In a heavy-bottomed handi or pan over medium heat, heat 1½ tbsp mustard oil until lightly smoking to remove pungency. Lower heat before adding onions.
Roast the onions: Add 3 grated onions to hot oil. Stir over low-medium heat until light golden. Add cloves and cardamoms; fry 1 minute until fragrant.
Add ginger-garlic paste: Mix in 2 tbsp ginger-garlic paste and sauté for 2–3 minutes until the raw smell disappears.
Roast the mutton: Add mutton pieces. Increase heat to medium and cook for 8–10 minutes, stirring frequently until juices release and oil begins separating.
Add reserved onion and spices: Add the reserved 1 grated onion and cook 2–3 minutes. Add the spice mix and salt with 2–3 tbsp water; sauté (bhunai) for 5 minutes.
Slow-cook the mutton: Pour in 1–2 cups water, bring to boil, cover tightly, and simmer on low for 30–40 minutes until meat is tender.
Add coconut powder: Stir in 2 tbsp desiccated coconut, cover, and simmer until meat is completely soft and succulent.
Add yogurt: Lower heat completely. Gradually whisk in room-temperature yogurt, stirring continuously to prevent curdling. Cook 5–7 minutes until oil resurfaces.
Add khoya: Add crumbled khoya and mix thoroughly. Simmer on low for 5 minutes until gravy is rich, thick, and coats the mutton.
Finish & rest: Stir in 1 tsp garam masala. Check seasoning. Turn off heat, cover, and let rest for 10 minutes. Garnish with fresh coriander, slit green chilies, and ginger julienne.
Do not rush the onion roasting or the bhunai stage. Allow the dish to rest for 10 minutes off the heat so the spices settle and flavors deepen. For pressure cooker instructions: roast as directed, pressure cook with water until tender, release pressure, reduce liquid, then finish with yogurt, khoya, and garam masala.
Serving Suggestions
Serve hot Degi-style bhuna gosht with:
- Tandoori naan
- Rumali roti
- Tawa roti
- Chapati
- Lachha paratha
- Sheermal
- Plain basmati rice
- Jeera rice
- Cucumber and onion salad
- Mint raita
- Lemon wedges
Garnish with fresh coriander, slit green chilies, and a little ginger julienne before serving.
Important Tips for Perfect Bhuna Gosht
- Do not rush the onion frying: The onions form the base of the gravy. Fry them slowly until light golden. Dark, burnt onions can make the dish bitter, while undercooked onions may leave a raw taste.
- Roast the mutton properly: The mutton needs at least 8–10 minutes of roasting with the onion and ginger-garlic mixture. This develops the flavor and helps the masala coat the meat properly.
- Add water carefully: Bhuna gosht should have a thick, concentrated gravy. Add only enough water to cook the mutton. Too much water will turn it into a regular mutton curry.
- Use a heavy-bottomed pan: A heavy-bottomed pan distributes heat evenly and reduces the risk of the masala sticking or burning. Slow cooking in a handi or heavy pan gives the best flavor.
- Add yogurt over low heat: Always lower the heat before adding yogurt. Add it gradually while stirring continuously to prevent curdling.
- Do not skip the resting time: Resting the dish for 10 minutes after cooking allows the gravy to thicken and the flavors to blend.
Can I Make Bhuna Gosht in a Pressure Cooker?
Yes, bhuna gosht can be made in a pressure cooker when you are short on time.
Follow the same process until the mutton has been roasted with the onions, ginger-garlic paste, and spices. Add water, close the pressure cooker, and cook until the mutton is tender.
Once the pressure releases naturally, open the cooker and continue cooking without the lid until the excess water evaporates and the oil separates. Then add yogurt, khoya, and garam masala as instructed.
However, the slow-cooked version made in a heavy-bottomed pan generally has a deeper and more authentic flavor because the mutton gets more time to absorb the spices.
How to Make Bhuna Gosht with Chicken
You can use the same recipe with chicken, but the cooking time will be much shorter.
Use bone-in chicken for better flavor. Cook it with the masala for approximately 20–25 minutes, or until tender. Add the yogurt and khoya near the end and continue cooking until the gravy becomes thick. Avoid overcooking chicken, as it may become dry.
How to Make Bhuna Gosht with Beef
This recipe can also be prepared with beef, although the cooking time will be longer than mutton.
Use a tender cut of beef and cook it slowly with enough water until soft. Add the yogurt and khoya only after the meat is nearly tender.
Storage and Reheating
Allow the bhuna gosht to cool completely before storing it.
- Store it in an airtight container in the refrigerator for up to 3 days.
- For longer storage, freeze it for up to 2 months.
- Thaw frozen bhuna gosht in the refrigerator overnight.
- Reheat it gently in a pan over low heat.
- Add a few tablespoons of water if the gravy has become too thick.
The flavor often becomes even better the next day because the meat continues to absorb the spices.
Frequently Asked Questions
What is bhuna gosht?
Bhuna gosht is a slow-cooked meat dish in which the mutton is thoroughly roasted with onions, ginger-garlic paste, and spices. The word “bhuna” refers to the process of frying or roasting the ingredients until the oil separates and the masala becomes thick and intensely flavorful.
Why is my bhuna gosht not dark in color?
The color mainly comes from properly fried onions, red chili powder, and the bhunai process. If the onions are undercooked or too much water is added, the gravy may remain pale and thin.
Can I skip khoya?
Yes, you can skip khoya if it is unavailable. The dish will still taste delicious, although the gravy may not have the same rich, grainy texture.
Can I replace mustard oil?
You can use vegetable oil, sunflower oil, or ghee. However, mustard oil gives the most traditional flavor and aroma.
Can I use fried onions instead of grated onions?
Freshly grated onions are recommended for this recipe because they dissolve into the gravy and create a thick texture. Fried onions may be used, but the taste and consistency will be slightly different.
Why did my yogurt curdle?
Yogurt can curdle when it is added to a very hot pan. To prevent this, whisk the yogurt well, lower the heat, and add it gradually while stirring continuously.
How do I know when the mutton is cooked?
The mutton is ready when it becomes tender and can be pierced easily with a fork or spoon. The meat should remain attached to the bone but should not feel chewy.
Nutrition Information
The following values are approximate and may vary depending on the cut of mutton, amount of oil, and serving size:
- Calories: Approximately 430–500 per serving
- Protein: Approximately 30–35 grams
- Fat: Approximately 28–35 grams
- Carbohydrates: Approximately 10–15 grams
Final Thoughts
This homemade Degi-style bhuna gosht is a wonderful alternative to regular mutton curry and traditional korma. Its thick masala, tender meat, roasted spices, and rich texture make it perfect for weekends, family dinners, Eid gatherings, and special occasions.
The most important thing to remember is to give the mutton enough time to roast. Do not add water too early, do not rush the onions, and allow the dish to rest before serving. These small steps create a rich, restaurant-style flavor in your own kitchen.
Try this spicy and aromatic bhuna gosht with hot naan or rumali roti, and enjoy a hearty meal with your family!
Related Articles You Might Like


Reader Comments
Leave a Comment
No comments yet. Be the first to share your thoughts!