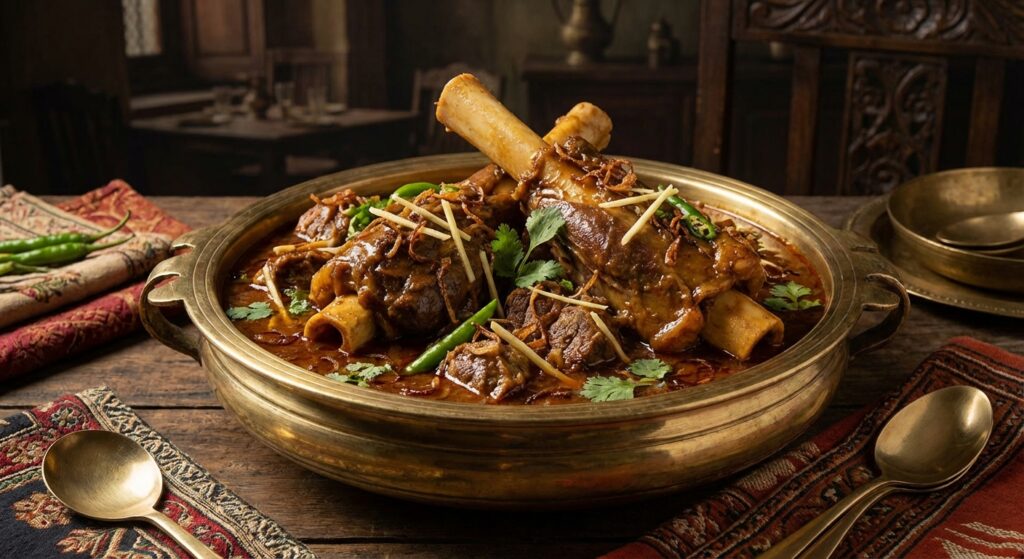
Nalli Nihari – Royal Nawabi Slow Cooked Mutton Curry
Among the vast repertoire of South Asian meat curries, nalli nihari occupies a position of unparalleled prestige. It is the dish that defines the culinary legacy of the Mughal courts and the Nawabs of Awadh, a slow-cooked masterpiece that transforms tough cuts of meat into a tender, succulent delicacy bathed in a rich, aromatic gravy. The term nalli refers to the bone marrow, which is the crown jewel of this dish, while nihari, derived from the Arabic word nihar meaning morning, speaks to its traditional role as a breakfast dish enjoyed after the dawn prayers.
Nalli nihari is not just a curry. It is an experience, a ritual, and a connection to centuries of culinary refinement. The overnight slow-cooking technique, the complex spice blend, and the ritualistic way it is served all contribute to its status as one of the most revered dishes in the entire subcontinent. In this detailed guide, we will explore what makes nalli nihari special, from the specific cut of meat to the overnight cooking process and the prized tari that crowns the finished dish.
What Makes Nalli Nihari Special
What sets nalli nihari apart from other meat curries is the combination of three essential elements that come together during the long, slow cooking process. First, the nalli or bone marrow slowly melts and enriches the gravy with an incredibly luxurious, buttery flavor and silky texture. The marrow fats emulsify into the sauce, creating a richness that no amount of cream or butter can replicate. Second, the connective tissue in the shank meat completely dissolves into the gravy, giving it a naturally thick, velvety consistency that is a hallmark of authentic nihari. Third, the spice blend, which is a carefully balanced mixture of warming spices, slowly infuses into the meat and gravy over hours of cooking, creating a depth of flavor that is both complex and harmonious.
The result is a dish where the meat is so tender that it practically dissolves on your tongue, the gravy is silky smooth with layers of spice flavor, and each bite is enhanced by the rich, creamy bone marrow. It is this combination of textures and flavors that makes nalli nihari a truly transcendent culinary experience.
The Cut of Meat: Understanding Nalli
The choice of cut is what makes nalli nihari different from regular nihari. Nalli specifically refers to the shank portion of the leg of goat, lamb, or beef. The shank is a hard-working muscle that is dense with connective tissue, collagen, and sinew. While these characteristics make it a tough cut for quick cooking methods, they are precisely what make it ideal for the slow, prolonged cooking of nihari.
When you purchase nalli, ask the butcher to cut the shank into large pieces with the bone intact. The bone contains the marrow, which is the prized component of the dish. A good piece of nalli will have a cross-section of the leg bone with the marrow visible in the center, surrounded by a thick layer of meat and connective tissue.
For the best results, use thehind shank, which is larger and has more meat and marrow than the fore shank. Each piece should be approximately 4 to 5 inches long, giving you a generous portion of both meat and marrow per serving. For a family of 4 to 6, you will need approximately 1.5 to 2 kilograms of nalli pieces.
The quality of the meat matters significantly. Look for fresh, bright red meat with white fat and no signs of discoloration or off-odors. In South Asian markets, ask for nihari cut, and the butcher will know exactly what you need.
The Spice Blend: Heart of the Nihari
The spice blend is the soul of nalli nihari, and every family and restaurant has its own closely guarded recipe. However, certain spices are essential and non-negotiable in an authentic nihari masala. Understanding each spice and its role in the overall flavor profile is key to mastering this dish.
Fennel Seeds: The most important spice in nihari masala, providing a sweet, slightly anise-like flavor that balances the heat and warmth of other spices. Use 3 tablespoons of fennel seeds, lightly toasted and ground.
Dry Ginger Powder or Sonth: Unlike fresh ginger, dry ginger has a more concentrated, sharp heat that permeates the gravy during the long cooking process. Use 1 tablespoon.
Kashmiri Red Chili Powder: This variety provides a vibrant red color and mild heat. Use 2 tablespoons for the signature reddish hue of nihari without excessive spiciness.
Long Pepper or Pippali: This rare spice provides a complex, lingering heat that is distinctly different from black pepper. It is one of the key differentiators between authentic nihari and simplified versions. Use 1 teaspoon.
Mace and Nutmeg: These warm, sweet spices add a layer of complexity that is characteristic of Mughlai cuisine. Use 1 small piece of mace and a quarter of a nutmeg, freshly grated.
Black Cardamom: The smoky, bold flavor of black cardamom adds depth and a rugged character to the spice blend. Use 2 pods, lightly crushed.
Stone Flower or Dagad Phool: This lichen adds an earthy, subtle flavor that is difficult to describe but impossible to replicate with any other ingredient. Use 1 teaspoon.
Bay Leaves, Cloves, and Black Pepper: These provide the warm, aromatic base that supports the more exotic spices. Use 2 bay leaves, 4 cloves, and 1 teaspoon of black peppercorns.
Dry roast all the whole spices except mace and nutmeg in a pan over medium-low heat for 5 minutes until fragrant. Cool completely, then grind with the mace, nutmeg, and any powdered spices to a fine powder. This freshly ground masala will be incomparably more flavorful than any store-bought version.
The Overnight Slow-Cooking Technique
The overnight slow-cooking technique is what transforms tough shank meat and a complex spice blend into the silky, aromatic stew that is nihari. This is not a dish you can rush. The long, gentle cooking process is essential for several chemical and physical transformations that create the final result.
Start by heating 4 to 5 tablespoons of ghee in a heavy-bottomed pot, ideally a cast iron Dutch oven or a traditional brass degchi. Add 2 large onions, thinly sliced, and cook over medium heat for 15 to 20 minutes until they are deep golden brown. The caramelization of the onions adds a natural sweetness and body to the gravy.
Add 3 tablespoons of ginger-garlic paste and cook for 2 minutes. Then add the freshly ground nihari masala along with 1 tablespoon of salt. Stir and cook the masala in the ghee for 3 to 4 minutes until the oil separates from the mixture. This bhunai step is critical for developing the deep, complex flavors that define nihari.
Add the nalli pieces to the pot and sear them on all sides for 3 to 4 minutes. The searing creates a flavorful crust on the meat and helps seal in the juices. Once the meat is browned, pour in enough warm water to cover the meat by 2 inches, approximately 1.5 liters. Add 2 bay leaves and bring the liquid to a boil.
Reduce the heat to the lowest possible setting. If using a gas stove, use a diffuser or tawa under the pot to distribute the heat evenly. Cover the pot tightly and let the nihari cook undisturbed for 8 to 12 hours. In the traditional method, this was done overnight over the dying embers of a coal fire, with the dish ready by morning.
In a modern kitchen, you can start the nihari in the evening and let it cook overnight on the lowest heat setting. Check once every few hours to ensure the liquid has not reduced too much and to give it a gentle stir. By morning, the meat will be falling off the bone, the connective tissue will have completely dissolved into the gravy, and the kitchen will be filled with the intoxicating aroma of slow-cooked spices.
The Tari: The Prized Oily Layer
The tari is the thin, reddish-orange layer of spiced oil that floats on top of the finished nihari. It is considered the most prized part of the dish and is often spooned over the naan first before diving into the meat and gravy. The tari carries much of the spice flavor and provides a rich, oily contrast to the thick, gelatinous gravy beneath.
The tari forms naturally during the long cooking process as the ghee separates from the gravy and rises to the surface, carrying with it the fat-soluble compounds from the spices. To ensure a good, generous tari layer, use an adequate amount of ghee at the beginning and do not skim the fat during cooking.
Some cooks enhance the tari by preparing a separate tempering of ghee and Kashmiri red chili powder that is poured over the finished nihari just before serving. Heat 3 tablespoons of ghee, add 1 teaspoon of Kashmiri chili powder, and pour it over the top of the nihari. This adds a fresh layer of color and flavor to the tari.
Serving Nalli Nihari with Naan
The way nalli nihari is served is an integral part of the experience. The traditional accompaniment is fresh, hot naan bread, preferably tandoori naan or khameeri roti, which is a leavened bread that has a soft, fluffy texture perfect for soaking up the rich gravy.
To serve, ladle the nihari into deep bowls, ensuring each portion has at least one piece of nalli with the marrow bone intact. Spoon a generous amount of the thick gravy over the meat, making sure to include a good amount of the tari on top. Garnish with freshly chopped coriander, julienned ginger, sliced green chilies, and a squeeze of lemon juice.
Provide a small spoon alongside each bowl so that diners can scoop out the bone marrow and spread it on their naan. This act of extracting the marrow and savoring it on warm bread is one of the great pleasures of eating nalli nihari. The creamy, buttery marrow melts into the bread and combines with the spiced gravy to create a bite that is pure bliss.
A side of sliced onions mixed with lemon juice and a pinch of salt is essential. The acidity and crunch of the onions cut through the richness of the nihari and cleanse the palate between bites. Some establishments also serve a side of their nihari masala for those who want to add extra spice.
Common Mistakes to Avoid
- Using lean cuts: Nihari requires meat with plenty of connective tissue. Lean cuts will become dry and stringy during the long cooking process.
- Cooking on too high heat: The heat must be extremely low and consistent. High heat toughens the meat and prevents the collagen from dissolving properly.
- Skimming the fat: The tari is an essential component. Do not skim the fat from the surface during or after cooking.
- Using pre-ground spices: The volatile oils in pre-ground spices dissipate quickly. Always use freshly roasted and ground spices for the best flavor.
- Not cooking long enough: Nihari requires a minimum of 8 hours of slow cooking. Shortcuts with pressure cookers can produce acceptable results, but the texture and flavor will not be the same.
Frequently Asked Questions
Can I make nalli nihari in a slow cooker?
A slow cooker is an excellent alternative for making nalli nihari. Sear the meat and cook the masala on the stovetop first, then transfer everything to the slow cooker with the water. Cook on low for 10 to 12 hours or on high for 6 to 8 hours. The slow cooker provides consistent, even heat that is ideal for nihari. However, you will miss the subtle smokiness that comes from cooking over a wood or coal fire. To add this, use the dhungar method at the end of cooking.
What is the difference between nihari and qorma?
While both are rich, slow-cooked meat curries, they are fundamentally different dishes. Nihari is made with shank meat that is slow-cooked for 8 to 12 hours until the connective tissue completely dissolves into the gravy, creating a naturally thick, gelatinous sauce. Qorma uses a variety of cuts and is cooked for a shorter time, with the thickness coming from yogurt, cream, or nut pastes. Nihari has a specific spice profile centered on fennel, long pepper, and dry ginger, while qorma uses a different blend that includes saffron, poppy seeds, and white pepper.
Why is my nihari gravy too thin?
Thin gravy usually means the nihari has not been cooked long enough. The natural thickening of nihari comes from the dissolved collagen and connective tissue, which takes many hours to break down. If your gravy is still thin after 8 hours, continue cooking for another 2 to 3 hours. If you need to thicken it quickly, mix 2 tablespoons of roasted gram flour with a little water to form a slurry and stir it into the gravy. Cook for another 15 minutes to eliminate any raw flour taste.
How do I serve nalli nihari for a large gathering?
Nalli nihari is actually an ideal dish for large gatherings because it can be made well in advance and tastes better when reheated. Prepare the nihari a day before the event and refrigerate overnight. The fat will solidify on top, which you can remove if desired or stir back in. Reheat gently on the stovetop over low heat, adding a splash of water if the gravy has thickened too much. For a gathering of 20, scale the recipe to use 5 kilograms of nalli and cook in a large stockpot. Serve buffet-style with a basket of warm naan, garnishes, and condiments.


Reader Comments
Leave a Comment
No comments yet. Be the first to share your thoughts!